BIG THIS WEEK

HAVE YOU SEEN?

Sunday, 4 December 2016

Festive Nail Designs


If you know me or having been reading this blog for awhile (It's been 4 years next year... OMG) you will know that not much excites me as much as sparkly nail polish. I have a draw that is sickeningly full of nail polish, that is pretty much exclusive to festive season... because it's rarely ever appropriate to rock a red & gold glitter combo in spring. 

Therefore, this post isn't going to be a massive shock for you. I adore Christmas time and I adore sparkly nail polish so the pair are a match made in beauty heaven and I decided to share some of my favourite festive nail designs.

I've included 3 work appropriate designs and 2 all out in your face "IT'S CHRISTMAS BITCHES" designs. These are all insanely simple and most importantly they last.


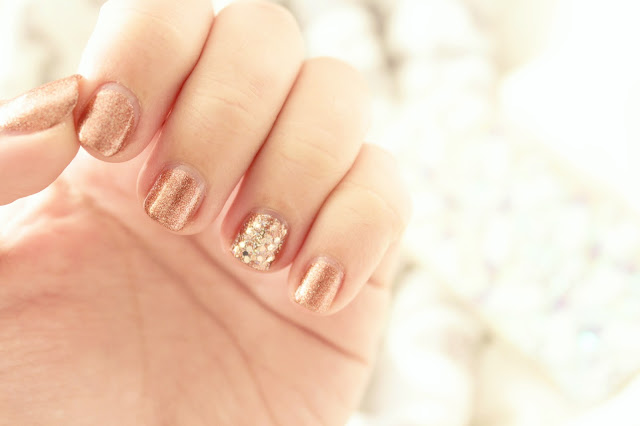
Copper Heaven.
- This little number is what I've got on my nails this second. Like the rest of the world, I'm all about the copper and rose gold right now and this combo is ideal for anyone who is looking for a blush toned metallic in their life. 
Polishes Used
Barry M Molten Metal Nail Paint in Copper Mine
Barry M Nail Paint in Rose Quartz Glitter


Gold & Holo. 
- I'm in love with a good Holographic glitter at the moment (I'm totally obsessed with Simply Nailogical!) Don't let the photos fool you, that ring finger has allllll of the rainbows thanks to probably my favourite holo glitter ever. Perfect for the Christmas period! 
Polishes Used
Mavala 117 Treasure 
Nicole by OPI Dazzling With Talent 


Neutral Confetti.
- This is another recent one but I totally forgot to get a good photo on my camera for it so you will have to make do with this quick shot from my iPhone before I filed down my out of control thumb nail. I really loved the simplicity of this look. The neutral creme polish works nicely with the Gold Confetti polish and gives you a festive nail look that's totally suitable for even the most conservative work environment.  
Polishes Used
Barry M Gelly Hi-Shine Nail Paint in Almond
Barry M Nail Paint in Superdrug Limited Edition Gold Confetti ** 


Red & Gold Festivities. 
 - This is one from last year, but I really loved it at the time so I thought I would include it again this year. You can't get much more festive than a red & gold glitter combo.
Polishes Used
Barry M Gelly Hi-Shine Nail Paint in Limited Edition Sparkling Ruby ** 
Barry M Nail Paint in Superdrug Limited Edition Gold Confetti ** 


PolkaDot Christmas. 
- Another one from last year but I will 100% be doing something similar to this, if not the exact same this year. A sparkling red glitter topped off with a bright white dot is probably one of the most festive in your face Christmas designs you can do. It's like the classic candy cane but a little more cutesy, a little less elf. 
Polishes Used
Barry M Nail Paint in Red Glitter
Barry M Nail Art Pen in White 

You may have been able to spot a reoccurring brand here with Barry M and I promise you I'm not sponsored at all (Although, hit me up Barry M if you're interested! 😂). My nail polish collection consists mostly of Barry M, purely because they have the biggest range of colours and formulas for a reasonable student friendly price - so naturally a lot of my nail designs are made with them. 
But, there's nothing to stop you from recreating these with your own favourite polishes, I've just included what they are in case you are as in love with that Molten Metal polish as I am! 

 ** This was a limited edition polish from 2014 but you can buy a similar (if anything nicer) alternative here from NailsInc

Share:

Friday, 21 October 2016

Guide To Glitter Nails


It's getting to that time of the year when you're dying to crack out the glitter nail polish. I mean who doesn't want glittering nails at Christmas time?! But if you've ever worn glitter nail polish before you know that it can be the devil. I mean it can seriously be a massive pain in the arse to get your glitter polish looking flawless and then once you've eventually managed to get it looking acceptable, trying to get the stuff off again is a bloody nightmare. 

I've managed to hone my glitter polish skills over the past few months and I decided to share what I've learnt and right in time for the festive glitter filled season! 

The Application

Firstly, let's start with the glitter types. You will usually find glitter polishes in 2 main formulas, densely packed or loosely packed. The difference is pretty self-explanatory and the way that you should treat them is basically the same.  


If we start with the densely packed glitter (Nicole by OPI in ), you can see that one coat of polish gives a nice relatively even covering of glitter over the nail, it could definitely be worn like that if you wanted to and it would still look nice. However, what happens if you want a really densely packed glitter effect? Do you keep applying it with the brush in the hopes that it will eventually dry? 

Nah, grab yourself some cheap make-up sponges, paint the polish onto the sponge and dab it onto the nail. The sponge absorbs all the clear polish and leaves the glitter behind meaning you can easily dab on the glitter and get the effect you want without all the ridiculous hassle of doing it with the brush. 


Loosely packed polish is much the same, apart from it's even harder to get a good finish out of it. There is nothing worse than applying a glitter that takes about 50 layers to look even and well covered. This is where that magic little trick with the sponge comes into play once again. Just brush it onto the sponge, dab away and look at that final result! Super messy but the coverage is amazing and takes much less time, polish and effort to get it looking good. 

The Clean-up

Once you've perfected your nails the worse thing is trying to get rid of it. Glitter is notoriously difficult to get rid of and leaves you feeling like your only options are to pick it off or soak your fingertips in nail varnish remover - which is not fun kids. However, there are alternatives. 


Peel off base coats - These are big in America but not so easy to get hold of in the UK. However, Maybelline makes a peel-off base coat that works fairly well. You are meant to use these as you would a normal base coat, however, I've had a varying success that way. Instead, I've found that using it right before you apply the glitter works best. In the above photos I have applied the colour as normal, applying a normal base coat, two coats of nail polish and a top coat. I then applied the peel-off base coat allowed it to set and then applied the glitter in the process explained above. As you can see it neatly takes off all the glitter and leaves you with the normal polish underneath that is a doddle to take off. 


Acetone and a small brush - I've found that when removing glitter polish normal nail polish remover just doesn't cut it. Instead, I use a pure acetone (actually meant for removing artificial nails!), and a cheap eyeliner brush that works perfectly for getting around the edges of your nails and doesn't matter if it gets ruined by the acetone. You can bypass the peel-off base coat and just use pure acetone to take off glitter polish, and that does work but I wouldn't recommend it, as acetone strips all the natural oils out of your nails and leaves them brittle. 
Instead, I like to use this purely for clean-up. The sponging technique tends to leave a bit of a mess as you can see above, so by just dipping a brush into acetone and cleaning the edges you can get a really neat effect in no time at all! 


If you have any tips for glitter polish then please leave them in the comments! 

Share:

Tuesday, 27 September 2016

Preparing for Autumn - Seasonal Nails!


Oooooh, I love a good autumn nail! 

I don't know about you, but for me, autumn is the season that I want to paint my nails the most. I am obsessed with all the warm toned colours and the dark polish! In summer I'm usually too hot and bothered to care much about nail polish but now the weather is cooling down and I'm spending all my time indoors, all of the nail painting motivation has hit me! So I thought I would share a few of my favourites for autumn.


Barry M always have a great selection of colours to choose from and some of the colours I picked up last year are now standing favourites! 

L-R :
Plum, Chilli, Blackberry, Elderberry, Paprika, Black Pistachio


Mavala has also become a favourite brand of mine, these were always stocked in the Canterbury Boots but sadly my local Boots doesn't sell them. However, I will be hunting them out locally as not only are the formulas great but they also have great colours and cute packaging + they are like £3, which is astonishingly cheap! 

L-R:
85 Chicago, 117 Treasure


Sinful Colors by Kylie Jenner have been on my nails and Instagram more than any other polish these past few months and I absolutely adore them. The formulas are great, the colours are really unique and the price tag is cheap. Going into autumn these two are without a doubt going to be favourites.

L-R:
Konstellation & I Klove U


Nicole by OPI are a brand that I tend to dabble in, there's nothing wrong with them, I just don't often see them! But when I saw this beautiful holo glitter I knew I had to have it. It's the second part to that glitter gradient above and I am obsessed with it! 

Shade: Dazzling with Talent 


I couldn't have an autumnal nails post without mentioning these two Essie shades. 
Bahama Mama and Chinchilly are quintessential A/W shades for me and I absolutely adore them. Chinchilly is a firm favourite and is a warm toned grey-lilac shade. Whilst Bahama Mama is the ideal burgundy red that matches my tartan scarf perfectly! 


Last but certainly not least, in the cooler months it is imperative that you look after those digits and keep everything nice and hydrated! My favourite hand cream is the Roger & Gallet Rose Hands & Nails Cream. It smells beautiful, is super hydrating and not at all greasy. I'm totally obsessed with this stuff and the light floral scent is suitable all year round! 

What do you favour on your nails in autumn? 

Share:

Saturday, 19 September 2015

Top 5 Nail Polishes This Autumn


I don't know why but there's something about Autumn that makes me want to paint my nails all the time. I have a particular fondness for darker colours on my nails and that fits in pretty great with the colder weather but I've tried to steer away from those for this post and focus on some more Autumnal offerings. 
Share:

Friday, 12 June 2015

nailbox Subscription Box Review!

Hi Guys!

Today I've got a rather exciting post for you about a new Subscription box service that has opened up to the UK market called nailbox*! nailbox is a monthly subscription for £13.50 or you can buy a one off box to try for £15. In each box you receive 4 polishes and a nail tool/treatment/accessory. Each box is a mystery until its delivered so you don't know what polishes your getting until you open your box, but they are themed throughout the year so you are bound to have 4 polishes that are seasonal and wearable!

Share:

Sunday, 23 November 2014

TUTORIAL - Festive Nails!


As winters is coming (*cough* GOT reference *cough*) and the shops are starting to fill with christmassy goodies and sparkling lights, I've been getting into the festive vibe. 
Share:

Friday, 12 September 2014

THE BRAND || BarryM


I love nail polish. I have an addiction. It's true.
If you follow me on Instagram here you will probably already know this with the sheer amount of NOTD posts that usually 9/10 are BarryM polishes. What do I love about them?
Well, they are cheap, ranging between £2.99 and £3.99 per polish. They come in a variety of formulas including the classic Nail Paint, Gelly Hi-Shine and Matte solutions. The colour range is awesome with brand new releases all the time. All of that is great but the thing that keeps me coming back is the longevity of the polishes. Once dried they stay chip-free on your nails (with the aid of a good topcoat, I'm currently loving the OPI quick dry topcoat) for days!

3 in 1 Base/Top/Nail Hardener, Raspberry & Cappuccino. 

Here we have my tiny collection of the original "Nail Paint" which seems crazy considering how many others I have but I am least fond of this formula, it chips easier and takes ages to dry in my opinion.

Red Glitter, Gold Glitter, Superdrug Limited Edition 2012, Rose Quartz Glitter & Superdrug Limited Edition 2013.

Next we have the glitter polishes, These are mainly adored over the festive period but Rose Quartz is a year round favourite of mine!

50 years of Superdrug Limited Edition, Superdrug Limited Edition 2013, Station Road, Duchess, Nail Effects 321, Truffle & Mediterranean. 

Onto more limited editions and "effects" polishes! I love the Silk effect polish and I will definately be purchasing more of these soon!

Sugar Apple, Key Lime, Papaya, Rose Hip, Elderberry, Lychee, Blueberry, Watermelon, Greenberry, Plum, Pomegranate, Mango & Prickly Pear

As you can probably see, next we have my favourites! The Gelly Hi-Shine Polishes! These are amazing. I always pick up more every time I go into Superdrug. I just can't stop myself! Even now I think I need more!

Copa Cabana, Cancun, Miami, Malibu & Matte Topcoat

Now onto a new favourite of mine. I've really been getting into matte nails recently! Something about them looks so chic and effortless. I have been loving the bright shades Barry M released for summer and I look forward to getting my hands on some of the Autumn shades!


Barry M have also released Nail Art Pens!! They make nail art so quick and easy! It really does become effortless! I have both black and white although I must say that the white gets more use! 


I was even sporting some BarryM Gelly Hi-Shine in Mango whilst I took pictures so I decided to show you! This was 2 coats and a topcoat! It is so opaque and glossy! It is perfection in a polish!

I hope you've enjoyed your peek into my quite frankly ridiculous collection of polish! If you would like to see any swatches of these nail paints let me know down below and I will make sure I do it for a NOTD on my Instagram here. The chances are if you scroll through my Instagram feed you will find a lot of them any way!

Share:

Friday, 17 January 2014

© Bambi's Blogs | All rights reserved.
Blogger Template Developed by pipdig